
Every backgammon player remembers matches where the dice felt personally hostile. You rolled awkward splits while your opponent seemed to roll doubles on demand. Yet when master analysts review tournament games, they find that dice rolls account for far less variance than players imagine. The overwhelming majority of losses trace directly to repeatable, unforced errors.
In its modern form, each player begins with 15 checkers distributed across a board of 24 points, divided into four quadrants of 6 points each [1]. Two standard six-sided dice produce 36 equally likely rolling combinations on every turn, ranging from 1-1 to 6-6, with doubles counting four times [1]. The board is a dynamic landscape of geometry and probability. When you replace impulsive reactions with systematic habits, your win rate climbs immediately.
Here are the ten classic mistakes beginners make at the board, along with the precise habits that resolve them. If you are working through structured backgammon lessons, mastering these corrections will accelerate your progress across every match you play.
Mistake 1: The reflexive hit addiction
The most common impulse among novices is hitting every exposed checker (blot) on sight. Whenever an opposing checker sits alone, the beginner strikes, regardless of board context or defensive exposure.
Hitting is undeniably powerful, but striking deep in an opponent’s territory without defensive reinforcement is frequently suicidal. As noted in classic backgammon analysis, hitting an opposing blot in their home board when you have no inner board structure simply swaps places while leaving yourself exposed [2]. Leaving an isolated blot in return offers your opponent up to 11 direct hitting rolls out of 36, or approximately 30.6% of all possible dice combinations [1]. If your opponent strikes back from the bar, you lose critical race pips and give up board control.
The fixing habit: Ask yourself one question before every hit: “What does this hit achieve beyond sending a checker back?” Hit to escape trouble, hit to gain crucial tempo, or hit to build a home blockade. If a hit leaves you with an exposed blot against a stronger home board, look for an anchor or a constructive point-making move instead.
Mistake 2: Neglecting the golden points
Beginners often spend early rolls constructing peripheral outposts, such as making the 2-point, 1-point, or outer outfield points, while leaving the center of the board completely open.
In backgammon strategy, the 5-point on your home board and the 20-point (the opponent’s 5-point, universally known as the golden anchor) are the most critical assets on the entire board [2]. Magriel (1976) demonstrated that controlling the 5-point creates a formidable barrier to escaping checkers while serving as the cornerstone of any six-point prime. Conversely, owning the 20-point provides a safe haven that prevents you from being primed or blitzed.
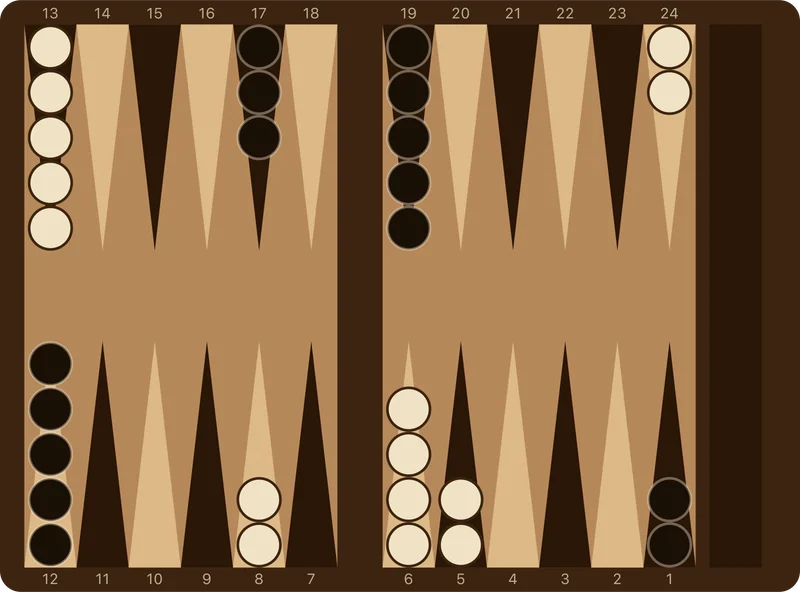
As shown on the board above, an opening roll of 3-1 should almost always be played by moving 8/5 and 6/5, securing the golden 5-point immediately. Bypassing this move to hit an outfield blot or advance back checkers is one of the costliest opening blunders a player can commit. To explore how other early rolls fit into this plan, review our guide to opening rolls in backgammon.
The fixing habit: Treat the 5-point and 20-point as prime real estate. Prioritize making, slotting, or contesting these two points above virtually all other opening maneuvers.
Mistake 3: Burying checkers on deep home points
When beginners lack an obvious constructive move, they often slide spare checkers down to their 1-point or 2-point, believing that tucking checkers deep into the home board keeps them safe.
Walter Trice (2004) identified this error as “checker burial” [3]. Checkers piled onto the 1-point and 2-point early in the game can never move again until the bearoff. They cannot hit opposing checkers in the outfield, they cannot assist in building primes across the 7, 6, 5, and 4 points, and they cannot serve as flexible landing pads. By burying two or three checkers prematurely, you reduce your active army from 15 checkers down to 12 or 13, fighting an uphill battle against a fully mobilized opponent.
The fixing habit: Keep your checkers active and high. Build your home board from the 6-point, 5-point, and 4-point downward. Never make the 1-point or 2-point early unless you are executing a blitz against multiple opposing checkers on the bar.
Mistake 4: Stripping key points bare
A stripped point is a point that holds exactly two checkers—the minimum required to maintain ownership. Beginners frequently clear away all third and fourth checkers from their 8-point, 6-point, and 13-point midpoint, leaving a skeleton structure.
Paul Magriel (1976) emphasized the doctrine of spare checkers [2]. Without spare checkers, any roll that cannot safely advance back checkers forces you to break an established point or leave an unwanted blot. Stripping your midpoint (the 13-point) leaves you with zero communication between your back checkers and your home board.
The fixing habit: Cultivate spare checkers. Strive to maintain three or four checkers on distribution outposts like the 8-point and midpoint. Spares give you the ammunition to slot points, hit loose blots, and absorb awkward rolls without shattering your defenses.
Mistake 5: Running back checkers without an anchor
Fearing that their two back checkers on the 24-point will become trapped, beginners often split them and run them into the outfield at the first opportunity, even when the opponent has assembled a menacing array of builders.
Robertie (2002) warns that fleeing prematurely leaves lone checkers stranded in the line of fire [4]. An opponent with active spares on their 8-point and 13-point midpoint will eagerly pounce on exposed runners. If you fail to secure an anchor—a made point in the opponent’s home board—you leave yourself wide open to an aggressive blitz that can cost you the game in two rolls.
The fixing habit: Do not run out into open space unless you have a substantial lead in the race or an escape path with a single roll. If the opponent controls the outfield, anchor firmly on the 20-point, 21-point, or 22-point, and wait for a favorable roll to break out together.
Mistake 6: Blind racing without counting pips
Many casual players play entire matches without ever calculating the pip count. They look at the physical position of their pieces and guess whether they are ahead or behind.
The pip count is the exact sum of points your checkers must travel to reach the tray. Transitioning from a contact battle to an open race requires checking this figure. Trice (2004) proved that an 8% to 10% pip lead justifies disengaging and breaking contact to sprint for home [3]. Conversely, if you trail by 10% or more, breaking contact is tactical surrender; you must maintain contact, build primes, and wait for a shot. For practical mental shortcuts on calculating this balance in seconds, read our guide on how to count pips in backgammon.
The fixing habit: Perform a quick pip calculation before making major running decisions. If you lead by 8% or more, disengage cleanly; if you trail, keep your anchors, trap opposing runners, and force your opponent to take risks.
Mistake 7: Playing passively against a blitz
When an opponent begins an aggressive blitz—attacking your home checkers repeatedly to close out the board—novices tend to cower. They enter on the lowest available point and make quiet outfield moves, hoping the storm passes.
A blitz gains momentum with every turn you spend doing nothing. If you do not actively fight back, your opponent will cover points roll after roll until you are trapped on the bar. The only reliable defense against a blitz is securing an anchor inside the attacker’s home board or striking back aggressively at any loose blot the attacker leaves.
The fixing habit: Against a blitzing opponent, prioritize establishing an anchor above all else. Even a low anchor on the 1-point or 2-point stops a complete closeout. If an opportunity arises to hit an attacking checker, take it, even at the cost of leaving a return blot, to rob the attacker of tempo.
Mistake 8: Losing your market with the doubling cube
The doubling cube introduces high-stakes equity decisions into backgammon. The most prevalent cube blunder among beginners is waiting for total certainty before offering a double.
Magriel (1976) introduced the concept of the “market loser” in doubling theory [2]. If you wait until your position is completely dominant, your opponent will simply decline (drop) your double, losing only 1 point. By waiting too long, you have lost your market: you gave away the chance to play for 2 or 4 points when your opponent was still mathematically obliged to accept.
Furthermore, beginners routinely drop doubles when they actually have ample equity to continue. Robertie (2002) outlines the fundamental mathematics of the take point [4]. Dropping a double guarantees a loss of 1 point (a 100% loss of that single stake). If you accept (take) and your chances of winning are at least 25% (1 in 4), taking is mathematically equal or superior to dropping. At a 25% win rate over 4 games, you lose -2 points three times (-6) and win +2 once (+2), totaling -4 points across 4 games (-1 per game). Whenever your winning chances exceed 25%, taking is the correct choice. For a detailed breakdown of cube thresholds, see our reference on when to double in backgammon.
The fixing habit: Double when you have a clear, volatile advantage, before a single lucky roll turns a strong game into an unplayable crush. When doubled, estimate your winning chances: if you have roughly a 1 in 4 shot (25%) or better, take the cube and fight.
Mistake 9: Crunching your home board
In mutual priming battles or holding games, players often find themselves waiting for an opponent’s blockade to break. Beginners in this position frequently move inner board checkers forward on small rolls, collapsing their highest points down toward the 1-point.
Trice (2004) explains that collapsing your home board ruins your timing [3]. When your home board crunches, you destroy the very landing points and traps that make hitting an opponent effective. If you subsequently hit a loose blot, your crunched board allows the opponent to re-enter immediately and escape unscathed. For more on coordinating blockades, consult our deep dive on priming games in backgammon.
The fixing habit: Preserve your home board integrity. When waiting out an opponent, move checkers in the outfield or play with your highest spare checkers first. Keep your 6-point, 5-point, and 4-point solid for as long as legal moves allow.
Mistake 10: Greedy bearing off against an active anchor
When beginners reach the bearoff phase with an opponent sitting on an anchor in their home board (such as the 1-point or 2-point), their immediate impulse is to yank off as many checkers as possible with every high die.
This greed often leads to disaster. Removing checkers from low points while leaving stacked, stripped points on the 6-point and 5-point leaves you vulnerable to forced direct shots when awkward rolls arrive later [2]. If you leave a blot, the opponent strikes from their anchor, traps your checker on the bar, and transforms a guaranteed victory into an agonizing defeat.
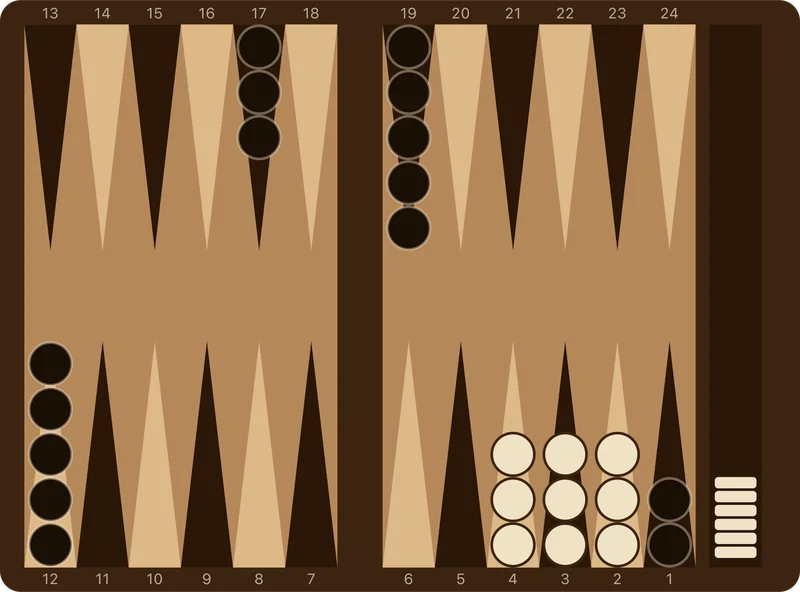
As demonstrated in the diagram above, when bearing off against an anchor, you must clear the highest points first (such as the 6-point and 5-point) while maintaining spare checkers on the 4-point, 3-point, and 2-point. By flattening the back points smoothly, you ensure that no subsequent roll can force an exposed blot. For a complete analysis of safe home-board technique, review our article on bearing off without losing in backgammon.
The fixing habit: When facing an enemy anchor, safety takes precedence over speed. Clear your highest points first, smooth out checker stacks, and only take checkers off the board when doing so leaves zero direct shots.
Questions people ask
What is the single biggest blunder beginners make in backgammon?
The most damaging blunder is hitting loose checkers indiscriminately without evaluating return shots. Striking without an established home board or a defensive anchor exposes you to counter-hits that forfeit race equity and control of the board.
How do I know when to transition into a race?
Check the pip count. If you hold a lead of 8% to 10% or more, disengage your checkers, break contact safely, and run for home. If you trail in the pip count, maintain contact and build blockades to force errors.
Why should I accept a double if my winning chances are only 25%?
Because declining a double forfeits 1 point immediately. Accepting at a 25% win rate yields the exact same expected outcome (-1 point per game) over the long run, and any winning chance above 25% produces superior value compared to surrendering.
Where can I practice these strategic habits?
You can practice against structured challenges and sharpen your tactical evaluation directly through our backgammon lessons, master the rules of backgammon, explore comprehensive backgammon strategy, or test your instincts by playing a friendly game to play backgammon online today.
Sources
- Encyclopædia Britannica. (2026). Backgammon: Game Rules, History & Strategy.
- Magriel, P. (1976). Backgammon. Quadrangle/The New York Times Book Co.
- Trice, W. (2004). Backgammon Boot Camp. The Fortuitous Press.
- Robertie, B. (2002). Backgammon for Serious Players. Cardoza Publishing.
- Boardgammon. “Learn Backgammon Step by Step.”
- Boardgammon. “Backgammon Strategy: Fundamentals & Winning Game Plans.”
- Boardgammon. “Backgammon Rules: How to Play and Board Setup.”
Found a mistake or an odd phrase? Tell us