The illusion of simplicity on thirty-two dark squares
Checkers, or draughts in Britain and Ireland, carries a deceptive reputation among casual players. Because the pieces move uniformly along diagonal lines and capture with straightforward forward jumps, beginners often mistake it for a game of simple arithmetic. Newcomers march their pieces forward haphazardly, grab whatever immediate jump appears, and hope their opponent blunders first.
Yet for centuries, serious players and mathematical researchers have documented that draughts is a game of uncompromising strategic depth [1]. In 1756, William Payne published the first systematic English guide to the game, codifying the principles that govern piece coordination and king promotion [2]. On a standard 64-square board, play unfolds exclusively across the 32 dark squares, where each player begins with 12 pieces arranged in three compact rows [2].
Within this compact geometry, every single advance carries permanent consequences. Unlike chess pieces that can retreat to regroup, an ordinary checker cannot move backward until it crosses the entire board to earn a crown. Every step forward gives up control of the territory left behind. If you advance without an overarching plan, your pieces become isolated targets.
To consistently win in checkers online, you must replace reactive jumping with proactive positional planning. Competitive mastery rests upon three foundational concepts: commanding the center of the board, defending your back row to deny enemy kings, and using the mathematics of piece trades to grind down your opponent.
Why center control is the heartbeat of draughts
The most enduring adage in checkers strategy warns: “A checker on the side is a checker denied.” While beginners naturally drift toward the side edges of the board—believing the edge provides safety from being jumped—experienced players know that the edges are traps.
The mathematical reason was demonstrated decisively by Arthur Reisman in his 1952 manual on tournament tactics [3]. A checker resting on an edge square can advance in only one direction. Its forward mobility is cut by 50%, reducing its active influence to a single diagonal line [3]. By contrast, a checker occupying a central square, such as squares 14, 15, 18, or 19 in standard numerical notation, commands two independent diagonal paths forward [3].
When your checkers command the central squares, they enjoy several vital advantages:
- Doubled branching mobility: Central checkers can step to the left or to the right to exploit emerging weaknesses, while edge pieces remain locked into predictable tracks.
- Territorial compression: By stationing pieces in the center, you cut the board in two. Your opponent’s pieces are forced to navigate around your central wedge, pushing them toward the passive outer perimeter.
- Multi-directional jumping threats: Captures originate from the center with wider coverage. A central checker threatens jumps into multiple sectors of the board simultaneously.
When you play through the opening phases, your primary objective should be to march checkers toward the center in supporting pairs. Avoid pushing a lone checker deep into the fourth or fifth row where it can be surrounded. Advance in connected pyramids, where each forward checker is backed by a trailing partner that protects its rear flanks.
The fortress of the back row: preserving your king baseline
If controlling the center represents your primary offensive engine, the back row is your irreplaceable shield. In standard English draughts, your back row consists of four baseline squares: squares 1, 2, 3, and 4 for Black, and squares 29, 30, 31, and 32 for White [4].
Grandmaster Richard Pask has emphasized throughout his strategic writings that your baseline pieces should remain stationary for as long as possible [4]. Because an opposing checker cannot become a king without landing directly on one of your four back-row squares, keeping those four checkers in place establishes an impenetrable barrier. As long as your four home squares remain occupied, your opponent cannot promote a single piece [4].
Beginners frequently make the critical mistake of developing their back-row pieces during the opening moves. They pull pieces off squares 2 or 3, hoping to join the fight in the center. The moment you vacate square 2 or 3, you leave a gaping channel. An alert opponent will steer their pieces directly into the vacated square, crown a king, and terrorize your remaining forces from behind.
The power of the bridge formation
In tight middle-game battles, you will eventually need to advance some back-row pieces to maintain momentum. When this happens, top players strive to form “the bridge” [4].
The bridge is created by holding checkers firmly on squares 1 and 3 (or squares 30 and 32 for the second player) [4]. This two-piece structure creates an alternating defensive pattern. Any enemy piece attempting to infiltrate through square 2 is immediately blocked or captured. The bridge effectively paralyzes the enemy’s central breakthrough attempts while allowing you to develop flanking checkers safely.
Only vacate your final back-row squares under two conditions:
- When you are launching an unstoppable breakthrough of your own that guarantees an immediate king.
- When an unavoidable tactical exchange forces a capture that clears the baseline.
The mathematics of trading pieces: how to simplify when ahead
In checkers, capturing is not optional. Under the rules of checkers, whenever a jump is available, the player is legally required to take it. While casual players view forced captures as a nuisance, strategic players use them as their most lethal weapon.
The most reliable path to victory in checkers is disciplined material simplification. When you gain a material advantage—even by a single piece—your winning strategy immediately shifts: you should trade pieces at every favorable opportunity [3].
Consider the arithmetic of one-for-one piece exchanges highlighted by Reisman [3]:
- At the start of the game, with 12 pieces against 11, a 1-piece lead gives you a modest 8% advantage.
- If you systematically trade off four pieces per side, reaching 5 pieces against 4, that same 1-piece lead expands to a 25% advantage.
- Continue trading down to 3 pieces against 2, and your lead reaches a dominant 50% margin.
- Finally, when you trade down to 2 pieces against 1, your material advantage reaches 100%, leaving the lone enemy piece completely defenseless.
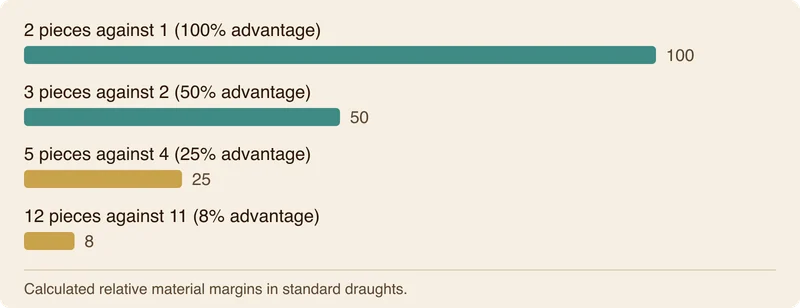
Every even trade reduces the opponent’s tactical counterplay and shrinks their defensive perimeter. When you are ahead, look for clean, equal exchanges that peel away defending pieces.
Conversely, when you find yourself behind in material, the opposite rule applies: never allow clean one-for-one trades. When trailing, your only hope lies in keeping the board complex, creating crowded clusters, and setting tactical traps where forced captures work in your favor.
Tactical shot techniques: the art of the sacrificial stroke
Because captures are mandatory, you can dictate your opponent’s exact moves by offering a deliberate sacrifice. In draughts literature, this tactic is known as a “shot” or “stroke” [2].
By sacrificing a single checker, you compel the opponent’s piece to land on a designated square. That landing square in turn positions the enemy piece directly in line for a devastating return jump of two or three pieces [2].
A classic example is the “slip shot.” A defending player slides a piece into an apparent blunder, offering an easy forward capture. But because the opponent must jump, their checker lands on an open square that sets up a double jump into the king row.
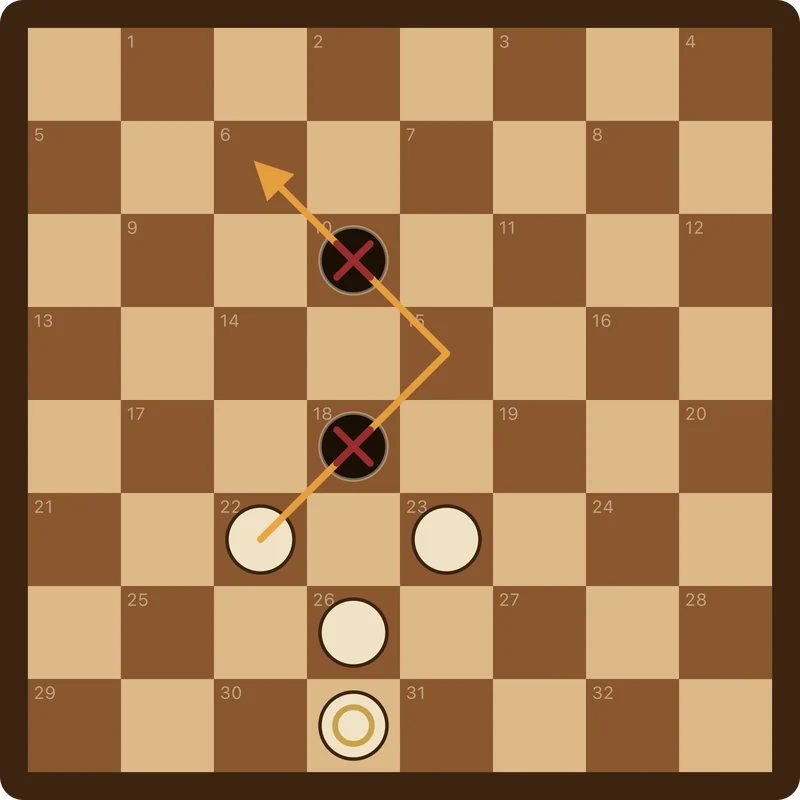
Mastering tactical shots requires visualizing the board two steps ahead:
- Identify which enemy pieces are obstructing your desired path.
- Determine where you can place one of your own checkers so the forced jump moves that enemy piece away.
- Calculate the return trajectory to ensure your jumping piece lands safely on an advantageous square.
Practicing tactical combinations on a board or solving daily layouts transforms your awareness, allowing you to spot defensive weaknesses before your opponent even realizes they exist.
King play and the geometry of the endgame
Earning a king completely alters the physics of the game. Kings gain the ability to move and jump backward as well as forward, making them vastly superior in mobility and tactical reach.
However, an inexperienced player with an extra king can still squander a win if they misunderstand board geometry. In the endgame, the 32 playing squares divide into two critical structural regions:
The double corner versus the single corner
On an 8×8 draughts board, two opposite corners feature distinct diagonal characteristics [2]:
- The double corner: Formed by squares 1 and 5 in one corner, and squares 28 and 32 in the opposite corner [2]. The double corner contains two interconnected playing squares that run parallel along the board edge. A king stationed in the double corner has two escape squares, making it nearly impossible to trap with a single enemy piece.
- The single corner: Formed by square 4 in the upper corner and square 29 in the lower corner [2]. The single corner terminates abruptly against the perimeter. A king caught in a single corner can be easily pinned and suffocated by an opposing king holding the adjacent diagonal.
When defending with fewer pieces, always steer your kings toward the safety of the double corner. When hunting down a lone enemy king, use your pieces to drive the opponent toward the single corner, where they run out of legal moves.
Controlling the long diagonal
The longest diagonal on the board connects square 4 to square 29, cutting directly through the center of the grid. Controlling this central highway allows your kings to sweep across the board from one side to the other in minimal moves, cutting off opposing pieces and coordinating multi-piece traps.
How strategy adapts across the world’s draughts variants
While the core principles of center control, back-row defense, and material trades apply everywhere, regional variations introduce subtle tactical nuances across checkers variants:
- English draughts (American checkers): Played on an 8×8 board with 12 pieces per side [2]. Men capture only forward, and kings move one square at a time. Positional patience and back-row preservation are at their absolute premium.
- International draughts: Played on a large 100-square board with 20 pieces per side [5]. Men can jump backward as well as forward, kings “fly” across multiple empty squares along open diagonals, and players are bound by the majority capture rule (you must choose the jump sequence that captures the greatest number of pieces). Tactical shots on the 10×10 board are exceptionally long and spectacular.
- Russian shashki: Played on an 8×8 board with flying kings and backward capture for men. Crucially, Russian draughts features in-flight promotion: if a man touches the king row during a multi-jump, it promotes immediately and continues jumping as a flying king.
- Turkish dama: Completely abandons diagonal play. Played on all 64 squares with 16 pieces per side moving orthogonally (forward and sideways) [5]. Captures occur horizontally and vertically, creating sweeping line-clearance tactics reminiscent of rooks on a chessboard.
Despite these differing movement rules, the fundamental truth remains unchanged: controlling the key intersections, guarding your home territory, and ruthlessly simplifying when ahead are the timeless principles of victory.
What scientific computing proved about perfect checkers
In 2007, computer scientist Jonathan Schaeffer and his research team at the University of Alberta published a landmark paper in Science announcing that 8×8 checkers had been solved [1].
Over 18 years of continuous computation, Schaeffer’s program Chinook traversed more than 5 × 10^20 positions [1]. The computational proof demonstrated that checkers is weakly solved: with flawless play from both sides, the game inevitably ends in a draw.
This scientific breakthrough does not diminish the game; rather, it elevates it. It proves that checkers is an exquisite mathematical puzzle where victory belongs to the player who maneuvers with greater strategic clarity and fewer inaccuracies. By understanding how the history developed in our overview of the history of checkers and exploring whether does chess make you smarter? in classroom research, players appreciate how ancient strategy games continue to challenge human intellect.
To test these principles against players worldwide or practice your endgame technique in real time, explore play checkers online and start applying center dominance in your next match.
Questions people ask about checkers strategy
What is the most important rule in checkers strategy?
The most important strategic rule is controlling the center of the board. Checkers stationed in the center enjoy two legal forward paths and wider jumping angles, whereas checkers moved to the side edges have their mobility cut by 50% [3].
Should you always keep your back row intact?
Yes, for as long as possible. In standard draughts, an opposing checker cannot become a king without reaching your back row [4]. Keeping your baseline checkers on their starting squares denies your opponent any promotion opportunities until the middle game opens up.
When should you trade pieces in checkers?
You should actively trade pieces whenever you hold a material advantage. As demonstrated mathematically, trading one-for-one when ahead magnifies your relative dominance from an 8% margin at 12 to 11 up to a 50% margin at 3 to 2 and 100% at 2 to 1, eliminating your opponent’s tactical counterplay [3].
What is the difference between the single corner and double corner?
The double corner consists of two interconnected squares (such as 1 and 5, or 28 and 32) that provide escape routes, making it easy for a king to defend itself [2]. The single corner (squares 4 and 29) ends against the board edge with no escape, allowing a king to be easily trapped.
Sources
- Schaeffer, J., Burch, N., Björnsson, Y., Kishimoto, A., Müller, M., Lake, R., Lu, P., & Sutphen, S. (2007). Checkers Is Solved. Science, 317(5844), 1518–1522.
- Payne, W. (1756). An Introduction to the Game of Draughts. London.
- Reisman, A. (1952). Championship Checkers: The Simplified Guide to Winning Checkers. David McKay Company.
- Pask, R. (2005). Solid Checkers: The Strategy and Tactics of English Draughts. British Draughts Federation.
- Boardgammon. “Checkers Variants: The Kinds of Draughts Played Around the World.”
- Boardgammon. “Checkers Crown: Play Online Checkers and Regional Draughts Variants.”
- Boardgammon. “Checkers Rules: How to Play, Movement, and Captures.”
- Boardgammon. “Play Checkers Online: Free Browser and Mobile Draughts.”
Found a mistake or an odd phrase? Tell us