Every competitive game of chess online that avoids an early checkmate or tactical miniature marches inexorably toward simplification. As queens, rooks, bishops, and knights leave the board, the nature of the contest transforms completely. What began as a bustling clash of tactical fireworks contracts into a quiet, barren landscape where only two kings and a handful of foot soldiers remain.
Many club players find this transition terrifying. In an open middlegame, intuition, general piece activity, and tactical threats can mask minor inaccuracies. But in a pure king and pawn ending, there is nowhere to hide. Without pieces to create counterplay, every single tempo carries absolute weight. A single careless king step does not merely forfeit an advantage; it immediately flips a won position into a dead draw, or a drawn position into an irrecoverable defeat.
The foundational truth of endgame play is that all piece endgames simplify into pawn endgames when remaining pieces are exchanged [1]. If you understand how to navigate king and pawn positions with scientific accuracy, your decision-making throughout the earlier phases of the game becomes vastly clearer. You will know with absolute certainty whether trading down into a pawn ending wins on the spot or seals your doom. To build this foundation, you must begin with the first fundamental tool: calculating pawn races through geometry.
What is the rule of the square?
Imagine a position where your opponent has pushed a passed pawn down an open file, and your own king is rushing across the board in desperate pursuit. Your pieces are gone, and your opponent’s king is too far away to help. You must immediately determine whether your king can intercept the enemy pawn before it reaches the promotion square on the 8th rank.
Beginners attempt to answer this question by calculating move by move: “I step here, the pawn advances there, I step closer, the pawn moves again.” Under time pressure, this repetitive counting frequently breaks down. Mental fatigue sets in, you lose track of whose turn it is, or you misjudge the board edge by a single square.
Masters bypass this tedious calculation by using a visual geometric shortcut known as the rule of the square [1]. The rule allows you to determine whether a defending king can catch an advancing passed pawn by constructing an imaginary geometric square on the chessboard:
- Count the number of squares from the pawn to its queening square on the 8th rank, including the square the pawn currently occupies.
- From the pawn, project an imaginary diagonal line toward the side of the board where the defending king is located.
- Complete the square by extending lines across the board to the promotion rank, creating a box whose width and height equal the pawn’s distance from promotion.
If the defending king can step inside this imaginary square on its turn—or is already standing within its perimeter—the king will catch the pawn before or on the promotion square. If the defending king cannot step inside the boundary of the square on its move, the pawn will successfully promote to a queen without needing any assistance from its own king [1].
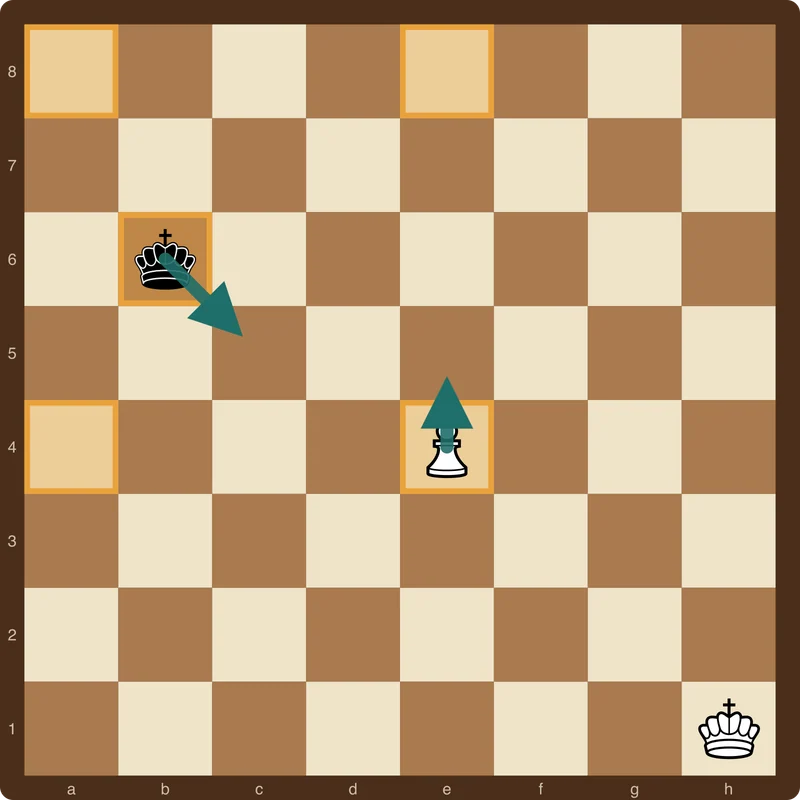
Consider the position illustrated in the diagram above. White has a passed pawn on e4, while Black’s king stands on b6. White’s pawn is four steps away from the promotion square on e8. Counting the pawn’s current square, the distance spans five ranks from rank 4 to rank 8. The square of the pawn therefore spans five files wide and five ranks tall, defined by the corners e4, a4, a8, and e8.
If White is to move, White plays 1. e5. The pawn moves forward, and the square immediately shrinks to four squares by four squares, with corners at e5, b5, b8, and e8. Black’s king on b6 is outside this new square and cannot enter it on the next turn, allowing White’s pawn to sprint to e8 untouched. Conversely, if Black is to move in the initial diagram, Black plays 1... Kc5 or 1... Kc6, stepping directly inside the e4–a4–a8–e8 perimeter. From that moment onward, Black maintains a tempo that intercepts the pawn upon arrival.
The two-square advance on the second rank
There is one critical nuance that traps unwary players: the initial two-square pawn jump. When calculating the square of a pawn situated on its starting square on the 2nd rank, the square must be constructed from the 3rd rank rather than the 2nd rank, because the pawn has the option to advance two squares on its initial move [1].
If a White pawn stands untouched on e2, its square does not begin at e2. Because White can leap directly to e4 on move 1, you must construct the imaginary square as if the pawn were already resting on e3. Failing to adjust for this initial jump causes defenders to believe they are safely within range, only to watch the pawn leap over their visual horizon and escape to victory.
You can develop your visual intuition for these patterns by working through practical tactical drills on chess lessons, where recognizing square perimeters becomes second nature.
What is the opposition in chess?
While the rule of the square governs isolated footraces, most practical endgames involve a direct clash between the two monarchs. In the opening and middlegame, the king remains tucked behind a protective barrier of pawns to avoid tactical attacks. But once queens are exchanged, the king undergoes a radical transformation. As François-André Danican Philidor famously established in 1749 in his French treatise “Analyse du jeu des Échecs,” pawns are the soul of chess, dictating endgame transitions and structural advantages [2]. In the endgame, the king becomes an active fighting piece that must lead from the front.
When two opposing kings approach each other, the rules of chess forbid them from ever occupying adjacent squares. A zone of control separates them. This geometric restriction gives rise to the concept of the opposition.
Direct opposition occurs when two kings face each other on the same file or rank, separated by exactly one empty square [1]. Because neither king can step forward into the opponent’s territory, a state of mutual blockage arises.
Here is the golden rule of opposition: The player who does not have to move holds the opposition.
Because chess rules compel a player to make a move on their turn, having the move when kings stand face-to-face is a profound disadvantage. The player whose turn it is must step sideways or backward, surrendering control over the adjacent forward squares. The opponent then steps forward into the vacated territory. This advancing maneuver is known as outflanking.
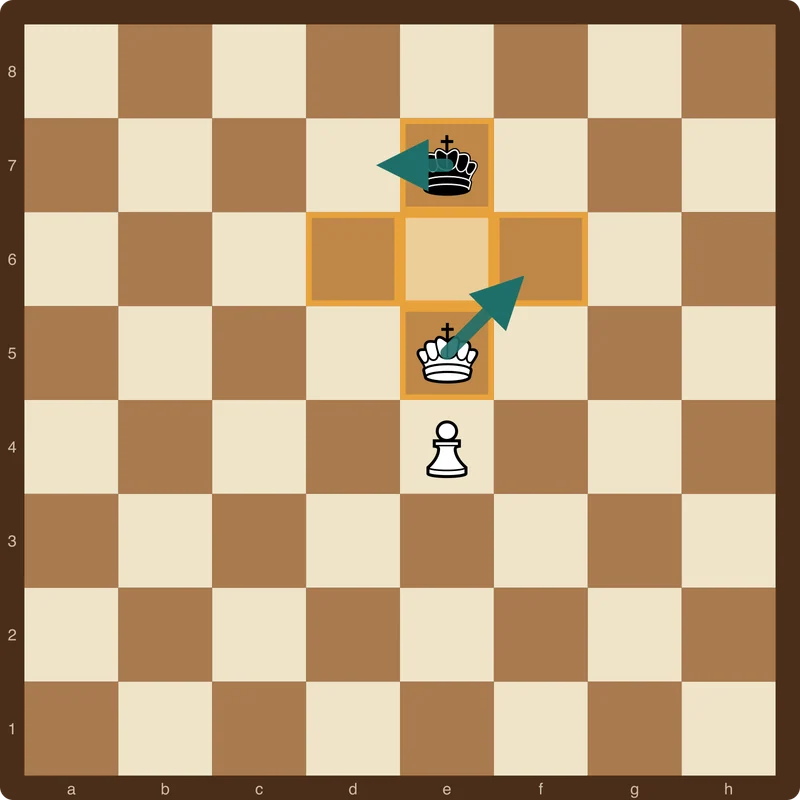
In the diagram above, White’s king stands on e5 and Black’s king stands on e7, separated by a single square on the e-file. White holds direct vertical opposition. Because it is Black’s turn to move, Black cannot maintain the barricade:
- If Black steps to the left with 1... Kd7, White outflanks to the right with 2. Kf6, seizing control of the critical promotion corridor.
- If Black steps to the right with 1... Kf7, White outflanks to the left with 2. Kd6, shouldering Black away and escorting the e-pawn forward.
By holding the opposition, White forces Black to yield ground. When studying fundamental rook endgames like the Lucena and Philidor positions, you observe similar principles of king shielding and barrier construction.
Distant opposition and diagonal opposition
The principle of opposition extends beyond adjacent squares. Distant opposition occurs when two kings stand on the same file or rank separated by three or five empty squares. The player who does not have to move holds the distant opposition, because whenever the opposing king advances, the distance shrinks until direct opposition is reached.
Similarly, diagonal opposition occurs when kings are separated diagonally by an odd number of squares. Through careful calculation, a defending king can step between files to maintain geometric equivalence, frustrating the attacker’s attempts to break through.
Key squares: the secret to winning pawn endgames
Every chess pawn has a set of coordinates known as key squares, or critical squares. In his 1987 analytical volume Comprehensive Chess Endings, Russian theorist Yuri Averbakh classified these coordinates with mathematical precision [3].
The definition of a key square is absolute: If the attacking king can occupy any one of the key squares belonging to its pawn, the pawn will promote by force, regardless of which player holds the opposition.
Understanding key squares simplifies endgames dramatically because you no longer need to calculate dozens of variations. You only need to answer one question: Can my king reach a key square?
Averbakh established the governing rules for key square locations based on the pawn’s rank [3]:
- For pawns on ranks 2, 3, or 4: The key squares lie two ranks ahead of the pawn, spanning three files (the pawn’s file and the two adjacent files). For example, if White has a pawn on e4, the key squares are d6, e6, and f6. If White’s king can step onto d6, e6, or f6, the game is won.
- For pawns on ranks 5 or 6: As the pawn advances deeper into enemy territory, the requirements ease. For a pawn on the 5th or 6th rank, the key squares lie immediately one rank ahead of the pawn across the same three files. For a pawn on e5, the key squares are d6, e6, and f6.
Lasker’s sixth-rank rule
In his celebrated 1896 instructional work Common Sense in Chess, World Champion Emanuel Lasker proved one of the most vital theorems in endgame theory [4]. Lasker demonstrated that if the attacking king occupies the 6th rank directly in front of its pawn, the pawn will inevitably queen through the 7th rank to the 8th rank, whether White or Black is to move [4].
Why is the 6th rank so magical? Consider a White king on e6 with its pawn on e5, facing a Black king on e8:
- If White is to move: White does not have the opposition, but it does not matter. White plays 1. e6. Black must retreat with 1... Kd8 or 1... Kf8. If Black plays 1... Kd8, White plays 2. Kf7, controlling e8. On the next turn, White pushes 3. e7+ and 4. e8=Q#.
- If Black is to move: Black must surrender the e8 square immediately with 1... Kd8 2. Kf7 or 1... Kf8 2. Kd7, securing the promotion path without resistance.
Lasker’s 1896 finding provides players with a clear strategic goal: when shepherding a passed pawn down the board, focus entirely on pushing your king to the 6th rank ahead of the pawn [4]. Once your king arrives on the 6th rank, the technical conversion is mathematically guaranteed.
The golden rules of practical pawn play
To execute these principles consistently in your own games, keep the following tactical maxims at the forefront of your calculation:
1. The king must lead, not follow
The most common mistake amateur players make in king and pawn endgames is pushing the pawn ahead of the king. A pawn pushed ahead of its monarch becomes vulnerable to blockade. Once the defending king sits directly in front of the pawn, it can hold the opposition and force a draw by stalemate.
Always advance your king first to secure territory, seize the opposition, and occupy key squares. Only advance the pawn once your king has established an impenetrable escort corridor ahead of it.
2. Triangulation and zugzwang
In complex pawn endings where both sides have locked pawn structures, you will frequently encounter positions of zugzwang—situations where any move weakens the defender’s position. To exploit zugzwang, you must often transfer the turn to your opponent without altering the piece arrangement.
The technique used to achieve this is triangulation [3]. Triangulation involves moving your king along three connected squares forming a triangle to lose a tempo. Because your king takes three moves to return to its starting post while the enemy king can only shuttle between two squares, you hand the turn back to your opponent, compelling them to yield.
3. Beware the rook pawn exception
There is one critical exception to the rules of key squares and opposition that every competitive player must memorize: the rook pawn (pawns on the a-file or h-file).
In 1941, American grandmaster Reuben Fine formulated in Basic Chess Endings that rook pawn endings are a theoretical draw if the defending king can reach the corner square or trap the attacking king in front of the pawn [5].
Unlike central pawns, a rook pawn has only one flank. If White has an a-pawn and a king, but Black’s king manages to reach a8 or c7, White cannot outflank the defender. If White pushes the pawn to a7, Black’s king steps to a8. White’s king must then either abandon the pawn (allowing Black to capture it) or step to a6, producing immediate stalemate. Even if White holds an extra pawn and a centralized king, a rook pawn against a cornered defender yields nothing more than half a point.
Just as in our exploration of minor-piece strategy in knight vs bishop endings, recognizing structural limitations saves games that appear lost on material.
How to train your endgame calculation
Mastering king and pawn endgames requires deliberate practice. You cannot internalize the geometry of the board solely by reading theory; you must visualize the squares until calculation becomes instinct.
- Practice pawn races against the clock: Set up arbitrary king and pawn positions and apply the rule of the square within three seconds. Testing your speed under simulated time pressure builds confidence for tournament play.
- Solve endgame puzzles daily: Regularly solve tactical setups on chess puzzles to sharpen your ability to spot breakthrough sacrifices, tempo-losing king maneuvers, and stalemate traps.
- Guard against loose pieces: Before simplifying down to a pawn endgame, make sure you do not shed pawns to intermediate tactical blows. As we discussed in our guide on loose pieces in chess, undefended pieces invite tactical catastrophe.
- Test your technique in real matches: Put your theoretical understanding into practice by playing a rated game of chess against players worldwide.
Questions people ask
How do you count the rule of the square if a pawn has not moved yet?
When a pawn is on its starting square on the 2nd rank, calculate the square as if the pawn were already on the 3rd rank. Because the pawn can leap two squares forward to the 4th rank on its first move, its promotion distance is shortened by one tempo.
What is the difference between direct and distant opposition?
Direct opposition occurs when two kings stand face-to-face separated by exactly one square on a rank or file. Distant opposition occurs when kings face each other across three or five empty squares. The player who does not have to move holds the opposition in both cases, maintaining the advantage as the kings draw closer.
Does having the opposition always mean you win?
No. Holding the opposition is a tool to control squares, but it does not guarantee a win if your pawn is too far behind or if you are dealing with a rook pawn. Opposition guarantees victory only when it enables your king to occupy one of the designated key squares ahead of your passed pawn.
Why are rook pawns so difficult to win?
Rook pawns have only one adjacent file, eliminating the attacker’s ability to outflank the defending king from the outside. If the defending king reaches the corner promotion square, it cannot be driven away without producing stalemate.
Sources
- Wikipedia. “King and pawn versus king endgame.” Wikimedia Foundation.
- Philidor, F.-A. D. (1749). “Analyse du jeu des Échecs.” London.
- Averbakh, Y. (1987). “Comprehensive Chess Endings: Volume 4, Pawn Endings.” Pergamon Press.
- Lasker, E. (1896). “Common Sense in Chess.” Innes & Co., London.
- Fine, R. (1941). “Basic Chess Endings.” David McKay Company.
Found a mistake or an odd phrase? Tell us