Rook endgames are famous for their stubborn complexity, yet their foundation rests on two bedrock technical positions. Every player who has fought through a long game knows the feeling of arriving at an ending with a solitary extra pawn, only to watch the win slip away through hesitation, or defending a pawn down and wondering whether resistance is futile.
In reality, theoretical clarity replaces guesswork once you understand how master technique simplifies late-game struggles. Sourced encyclopedic analysis of chess endings confirms that rook and pawn versus rook is the most frequent of all practical endgames [1]. When minor pieces trade off, rooks remain. Grandmaster John Nunn confirmed this through database studies in 1999, demonstrating that rook endgames constitute approximately 50% of all endgames encountered in competitive tournament play [2].
Whether you are converting an advantage or fighting for a half-point, almost every single-pawn ending eventually reduces to one of two fundamental tests: the Lucena position or the Philidor position. The Lucena position is the attacking gold standard, showing how to shepherd a pawn on the 7th rank to queen by building a bridge. The Philidor position is the defender’s ultimate fortress, showing how to draw by locking the opposing king behind a horizontal barrier before switching to relentless checks from the rear.
Mastering these two techniques provides an immediate return on investment. If you are learning the fundamentals through chess lessons, these two blueprints will save you dozens of lost half-points and turn missed wins into confident handshakes.
Why do rook endgames appear in half of all games?
To understand why rook endings dominate tournament play, consider how chess pieces enter the battle. Pawns march forward in the opening, knights and bishops jump into central skirmishes, and queens coordinate early attacks. Rooks, by contrast, begin life tucked into the corners of the board. They require open files to express their power, which means they rarely reach peak activity until several pawns and minor pieces have left the board.
By the time the middlegame thins out into an endgame, each player often has one rook and several pawns. If further trades occur, the game frequently distills down to a pure rook and pawn versus rook scenario. In those moments, players without technical knowledge often wander into time trouble, relying on intuition where exact geometry is required.
Intuition is unreliable in rook endgames because rooks are long-range pieces capable of attacking across the entire board. A king that appears safe can be cut off from behind, and a pawn that looks doomed can be protected from sixty-four squares away. That is why learning concrete endgame theory is essential for anyone who enjoys chess online or tests their skills in rated play.
What is the Lucena position and who discovered it?
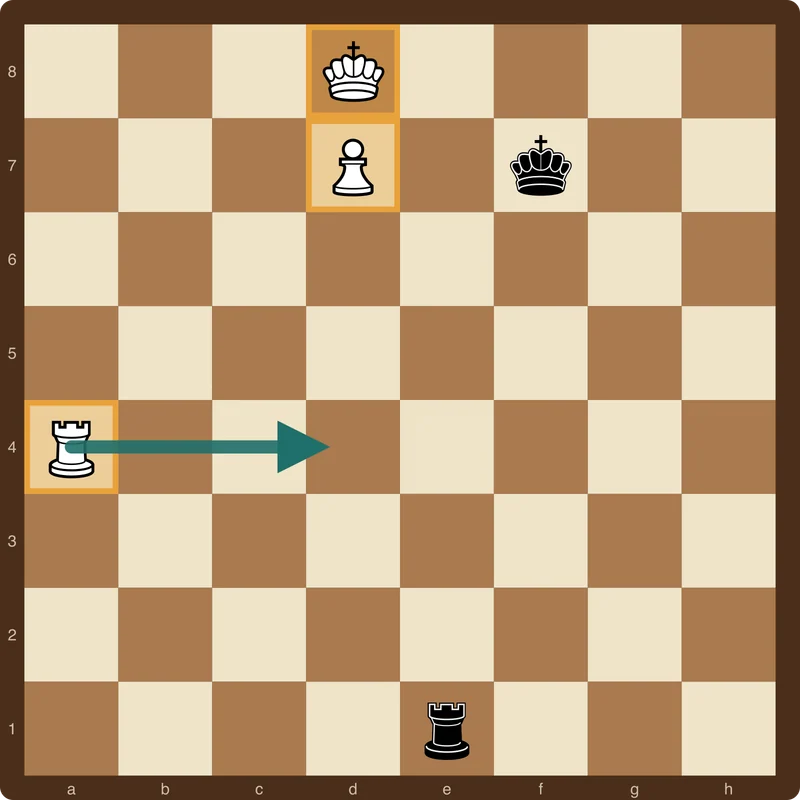
The Lucena position is the universal winning blueprint for the side with an extra pawn. In this position, the attacking pawn has reached the 7th rank, supported by its own king on the queening square right in front of it. The defending king has been cut off by at least one file, but the defending rook stands behind or beside the pawn, preventing the attacking king from stepping out directly.
Curiously, the position bears the name of Spanish player Luis Ramírez de Lucena, whose fifteenth-century treatise is one of the earliest printed books on chess. Yet historical research shows that the position never actually appeared in Lucena’s book. It was first published in 1634 by Italian master Alessandro Salvio in his treatise “Il Puttino” [3]. Salvio demonstrated the exact maneuver that turns this awkward standoff into a forced win. Despite the historical misattribution, chess tradition has honored the name Lucena for centuries.
The dilemma for the attacker in the Lucena setup is straightforward: White’s king on d8 wants to step aside so the pawn on d7 can promote to a queen. However, whenever White’s king steps to e7 or c7, Black’s rook delivers checks along the file or rank, driving the king back into hiding. If White simply shuffles the king back and forth, no progress is possible. Salvio’s genius was realizing that White’s rook must take an active role by constructing a protective shield.
How do you build a bridge in the Lucena position?
The winning technique in the Lucena position is known throughout chess literature as building a bridge. It is an algorithmic series of moves that forces the defending side into concession. Here is the step-by-step breakdown using a standard position with a White pawn on d7, White king on d8, and Black king cut off on the f-file:
Position: White: King on d8, Pawn on d7, Rook on a1. Black: King on f7, Rook on e2.Step 1: Ensure the defending king is cut off
Before beginning the bridge, White must ensure the defending king cannot approach the pawn. If Black’s king is on the e-file, White begins with a rook check: 1.Rf1+ Ke7, driving Black’s king to the f-file. The defending king must be kept at least one file away from the pawn so it cannot interfere with White’s escaping king.
Step 2: Place the rook on the fourth rank
The key move of the entire maneuver is placing the attacking rook on the 4th rank: 1.Ra4! (or 1.Rf4!). Beginners often wonder why the 4th rank is chosen rather than the 3rd or 5th. In his 2003 treatise Dvoretsky’s Endgame Manual, celebrated trainer Mark Dvoretsky explained the exact geometry [4]: the 4th rank is the only square that allows the rook to interpose on the 4th rank when White’s king reaches the 5th rank, while still maintaining distance from Black’s king.
Step 3: March the king out from the queening square
With the rook anchored on the 4th rank, White’s king steps out from in front of the pawn: 2.Kd7. Black has no choice but to start giving vertical checks from behind, because if Black does nothing, White plays 3.d8=Q immediately. Black plays 2...Rd2+.
White now marches the king diagonally forward toward the enemy rook: 3.Kc6 Rc2+ 4.Kd6 Rd2+ 5.Kc5 Rc2+. Notice how White’s king uses the pawn as an anchor, zigzagging down the board while staying in proximity to the advancing files.
Step 4: Cross the bridge
When White plays 6.Kd5 Rd2+, the moment of triumph arrives. White’s king has reached the 5th rank, directly adjacent to the 4th rank where White’s rook has been waiting. Instead of moving the king again, White plays:
7.Rd4!
The rook interposes itself directly between Black’s checking rook and White’s king. Black cannot take the rook with 7...Rxd4+ because after 8.Kxd4 Ke7 9.d8=Q+, White queens the pawn and easily wins the king and pawn endgame. And if Black does not capture, the check is blocked, White’s king is safe, and the pawn on d7 promotes on the very next move. White wins.
What is the Philidor position and how does it save the game?
While the Lucena position teaches you how to convert an advantage when attacking, the Philidor position is your lifeline when defending a pawn down. When you find yourself with a king and rook against a king, rook, and pawn, your primary goal is to reach the Philidor setup.
The technique was published in 1749 by French master and composer François-André Danican Philidor in his landmark book “Analyse du jeu des Échecs” [5]. Philidor showed that defense in rook endgames does not require complex tactical fireworks; it requires establishing a patient horizontal barrier.
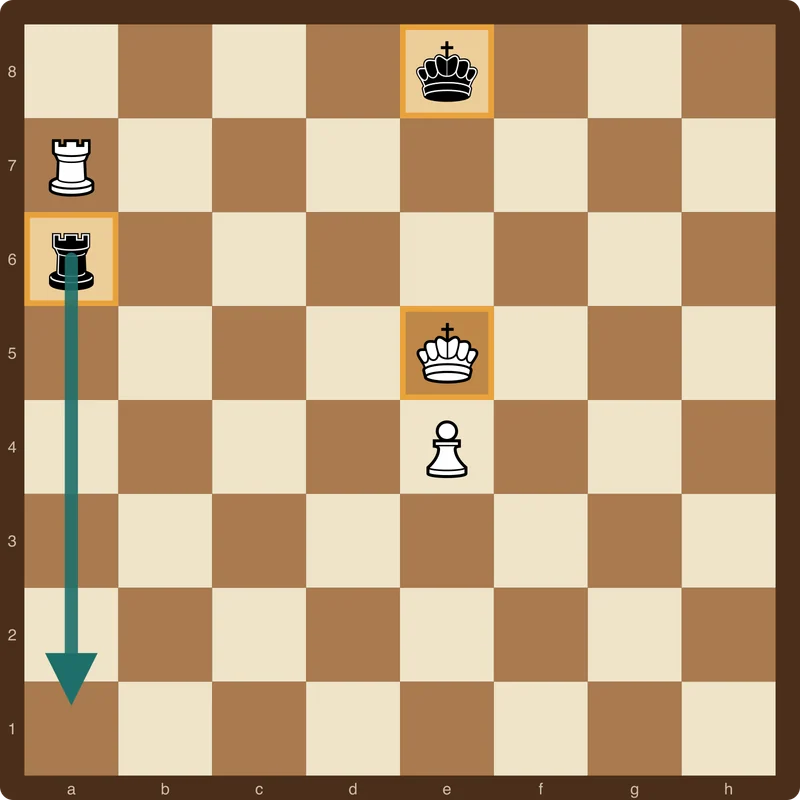
The classic Philidor position arises when the attacking side has a pawn on the 5th rank (for example, e5) with the attacking king behind or alongside it, while the defending king stands directly on the queening square in front of the pawn (for example, on e8).
The fundamental rule of the Philidor defense is called the 6th-rank barrier rule:
Defending rule: Keep your rook on your 6th rank (the 3rd rank from your side) until the attacking pawn advances to the 6th rank.By placing the defending rook on the 6th rank (such as a6 or b6 or h6), Black cuts off the entire rank. White’s king cannot step forward to e6 or d6 or f6 because the rook controls all those squares. As long as White’s king cannot advance ahead of the pawn, White cannot make progress or threaten checkmate.
White can shuffle the rook, deliver nuisance checks, or maneuver the king on the 5th rank, but Black simply shuffles the defending rook back and forth along the 6th rank (for example, Ra6–Rb6–Ra6), waiting calmly.
What do you do when the pawn pushes to the sixth rank?
Eventually, the attacking player realizes that shuffling the king on the 5th rank achieves nothing. Frustrated by the horizontal barrier, White will push the pawn forward: 1.e6.
The moment the pawn advances to the 6th rank, Black’s defensive plan switches immediately:
Transition move: Drop your rook to the 1st rank immediately! (1...Ra1!)Why does Black abandon the 6th rank? Because the pawn on e6 now occupies the square that Black was guarding, making the horizontal barrier redundant. More importantly, by pushing the pawn forward, White has surrendered the king’s shelter!
Before the pawn moved, White’s pawn stood on e5, providing an umbrella under which White’s king could shelter from vertical checks. Now that the pawn has advanced to e6, White’s king on e5 has no protection from checks from behind.
From the 1st rank, Black delivers endless checks:
1...Ra1! 2.Ke5 (or 2.Kd6) Re1+! 3.Kd5 Rd1+! 4.Ke5 Re1+!
White’s king has nowhere to hide. If White’s king retreats toward its own side of the board to escape checks, it abandons the pawn, allowing Black’s king or rook to capture it. If White’s king approaches Black’s rook, Black simply retreats to a safe distance along the file and resumes checking. White cannot escape the checks, cannot promote the pawn, and must accept a draw.
Why does passive defense fail where Philidor succeeds?
To appreciate the brilliance of the Philidor defense, one must understand what happens when a defender plays passively. Many club players, when facing a pawn on the 5th rank, mistakenly place their rook passively on the back rank (for example, on e8 or d8), hoping to blockade the pawn directly.
Passive defense almost always loses. When the defending rook sits passively on the 8th rank, White’s king is free to walk forward to the 6th rank. Once the attacking king reaches the 6th rank beside its pawn, devastating threats appear:
- Checkmating nets: The attacking rook can swing to the 7th or 8th rank, threatening back-rank mate against the cramped defending king.
- King displacement: White can use checks to drive the defending king away from the queening square, instantly transitioning into a winning Lucena setup.
- Sudden zugzwang: The defending rook runs out of safe squares along the back rank and is forced to abandon defense.
As Mark Dvoretsky stressed in his 2003 manual, active checking distance is the lifeblood of rook defense [4]. The Philidor defense works precisely because it refuses to be passive: it holds the king at bay on the 6th rank first, and then attacks from behind with maximum distance.
If you enjoy sharp tactical puzzles, you have likely encountered these transition moments where passive defense collapses. Developing consistent habits in both tactics and endgames, as explored in our guide on how to practice chess with puzzles, helps you recognize when a single passive move ruins an otherwise solid fortress.
Four golden rules for practical rook endgames
When you sit down to play chess online or compete over a physical board, remembering four practical rules will keep you on the right side of theoretical endings:
1. Rooks belong behind passed pawns
This timeless maxim, often attributed to Siegbert Tarrasch, holds true for both sides. When you are pushing a passed pawn, your rook belongs behind the pawn to support its march forward without blocking it. When you are defending against an enemy passed pawn, your rook belongs behind the pawn to deliver relentless rear checks as it advances.
2. Cut off the enemy king as early as possible
In the Lucena position, White’s bridge only works because Black’s king is cut off on the f-file. If Black’s king were on the e-file or d-file, it could step in to harass White’s rook or capture the pawn. Whenever you enter an endgame with an extra pawn, look for an immediate check that pushes the opposing king away from the action.
3. Keep maximum checking distance
When defending from behind, your rook must maintain at least three or four empty squares between itself and the enemy king. If your rook checks too close to the opposing king, the king simply steps toward the rook, attacks it, and forces it to flee without making progress. Maximum checking distance ensures that the king can never reach your rook without abandoning its pawn.
4. Know your destination before simplifying
The greatest endgame players do not calculate every move from scratch in time pressure; they trade pieces knowing exactly which theoretical benchmark awaits. If you are a pawn up in a complex ending, steer toward the Lucena bridge. If you are defending a pawn down, steer toward the Philidor horizontal barrier. When you know the final destination, every intermediate decision becomes simple.
Questions people ask
Can the Lucena bridge be built on any file?
The bridge-building maneuver works cleanly on all central and bishop files (the b, c, d, e, f, and g files). On the rook files (the a and h files), the Lucena position is much harder to win—and frequently drawn—because the board ends at the edge, meaning White’s king has only one side to step out toward. With knight and bishop pawns, the bridge is completely forced.
What should you do if you cannot reach the Philidor setup in time?
If White’s king has already breached the 6th rank before you can establish the horizontal barrier, you must employ secondary defenses, such as checking distance from the side (the frontal check method) or the back-rank defense if White’s pawn is not yet far advanced. However, these backup defenses require far greater precision. Striving for the Philidor position early is always the safest course.
Why is the fourth rank used for the Lucena bridge instead of the third?
Placing the rook on the 4th rank leaves the 5th rank open for your own king. When your king steps down to the 5th rank, your rook is positioned directly on the 4th rank to block the enemy check on that exact rank. If the rook were on the 3rd rank, the king would have to march further down the board, giving Black’s king time to approach.
Does the Lucena technique apply to checkmating?
While the Lucena bridge is primarily a queening maneuver, promoting the pawn to a queen typically delivers an immediate checkmate or forces the capture of the defending rook, leaving a decisive material advantage. For more on tactical mating patterns, explore our guide on forks, pins, and skewers in chess.
Sources
- Wikipedia. “Rook and pawn versus rook endgame.” Wikimedia Foundation.
- Nunn, J. (1999). “Secrets of Rook Endgames.” London: B. T. Batsford.
- Salvio, A. (1634). “Il Puttino, altramente detto, il cavaliero errante del salvio, sopra il gioco de' scacchi.” Naples.
- Dvoretsky, M. (2003). “Dvoretsky's Endgame Manual.” Milford: Russell Enterprises.
- Philidor, F.-A. D. (1749). “Analyse du jeu des Échecs.” London.
Found a mistake or an odd phrase? Tell us