Every checkers match reaches a moment when the noisy clash of the midgame falls silent. The crowded board of twenty-four checkers has thinned down to a handful of crowned kings and surviving men. Casual players often treat this phase as a chaotic scramble, chasing enemy pieces across the board in the hope that their opponent blunders into an accidental trap. Yet in competitive draughts, the endgame is not a scramble. It is a realm of absolute mathematical precision.
Unlike chess, where endgames frequently involve mating nets, stalemate escapes, and complex pawn promotions, checkers endgames are governed by the strict geometry of the diagonals and the relentless law of forced moves. When only a few pieces remain on the board, there is no place to hide. Every step either advances your position toward an airtight blockade or surrenders control to your adversary.
In 2007, an eighteen-year computational project led by computer scientist Jonathan Schaeffer proved that checkers from the starting position is an inevitable draw under perfect play [1]. As part of that historic milestone, Schaeffer’s team computed complete endgame databases encompassing thirty-nine trillion positions, solving every single configuration containing ten or fewer pieces on the board. In human play, however, perfection is rare. Games are won and lost in the endgame because players fail to recognize who holds the tempo, how to trap a runaway king, or how to dislodge an opponent sheltering in the corner.
Whether you enjoy casual matches at home or play competitive matches on Checkers Crown, understanding the fundamental endgame principles will fundamentally transform your results. When you follow the rules of checkers, an extra king is never just a spare piece; it is an engine of mathematical simplification that should lead directly to victory.
What is “the move” and how do you calculate the opposition?
The most critical strategic concept in any checkers endgame is known historically as “the move,” or the opposition. In an endgame where both sides possess an equal number of pieces, the player who holds the move possesses the positional advantage.
As draughts theorist James Lees codified in 1892 [2], having the move means that your pieces control the tempo of the board. Whenever your opponent advances toward you, your responding step maintains an invisible barrier. Because jumping and moving are compulsory, the player without the move is eventually forced to step forward into an ambush or surrender an essential pathway.
To understand the opposition in its simplest form, imagine an endgame where each side has a single king facing each other on the long diagonal. If dark moves from square 28 to square 32, and light responds by moving toward dark, light controls the distance. When the pieces meet face to face, dark is forced to advance directly into light’s line of capture or step away from the center.
Calculating the move without calculating dozens of individual steps in your head might seem intimidating, but classic draughts masters developed an ingenious shortcut based on the board’s geometry.
In 1892, James Lees explained the four-column system for calculating the move on an 8x8 checkers board [2]. The thirty-two playable dark squares on the board are divided vertically into four distinct columns of eight squares each. To calculate who holds the opposition on any given turn:
- Count the number of pieces belonging to the player whose turn it is that reside on odd-numbered squares within these four vertical files.
- If the total number of pieces on odd squares is an even number, that player holds the move.
- If the total number of pieces on odd squares is an odd number, the opponent holds the move.
Whenever a capture takes place, the balance of the move can change. An exchange of one piece for one piece flips the opposition from one player to the other, provided the pieces leave opposing columns. This mathematical reality explains why master players often initiate an unexpected trade in the late midgame: they are deliberately swapping pieces to seize the move before entering the king endgame.
In our analysis of checkers strategy, we explored how center control dominates the board. In the endgame, center control combined with the opposition turns an ordinary position into an airtight vice.
William Payne’s First Position: the foundation of endgame play
If there is a single endgame that every serious checkers player must commit to memory, it is William Payne’s celebrated “First Position.” First published in London in 1756 in An Introduction to the Game of Draughts [3], this setup is the grandest classical study in the game’s literature.
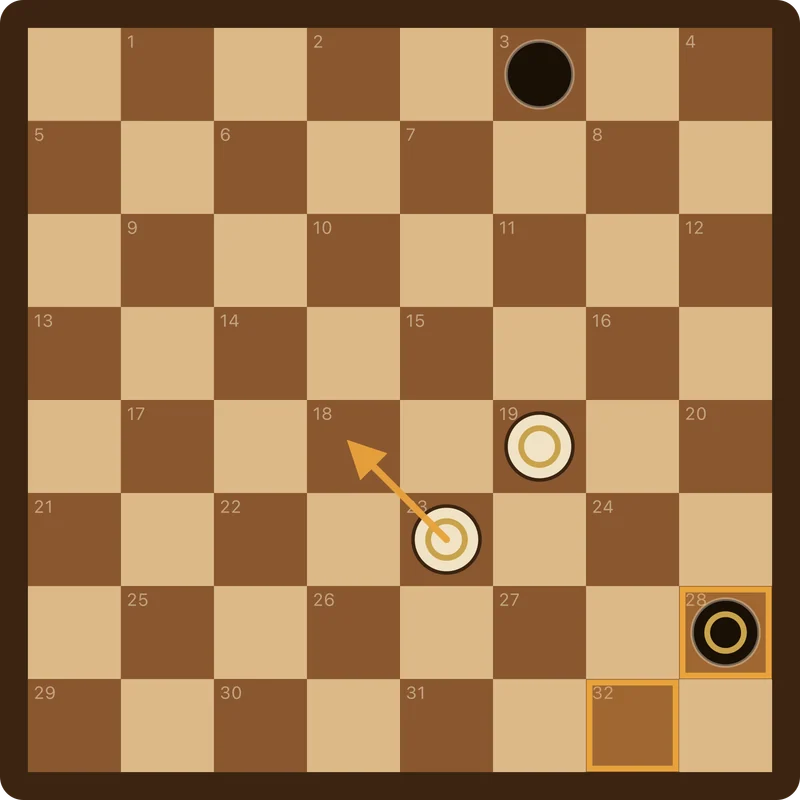
The position features two white kings operating in tandem against a black king and a black man. In its canonical setup, white holds kings on squares 19 and 23. Black has a king defending on square 28 and an unpromoted single man stationed far back on square 3.
At first glance, casual players might assume that black can hold an easy draw. Black’s king is already stationed near the safety of the double corner (squares 28 and 32), while the single man on square 3 appears safely out of reach. Yet William Payne demonstrated in 1756 that white can force a win with surgical accuracy [3].
The winning method relies on systematically squeezing black’s king and using the opposition to drive it away from its protective post. The standard sequence begins with a decisive thrust:
- White plays 23-18! This move immediately cuts off black’s escape route toward the center of the board.
- Black has only one viable response: the king retreats into the double corner by playing 28-32.
- White tightens the cordon by playing 18-22. White now commands the diagonal approach.
- Black attempts to maneuver outward by stepping to 32-27.
- White responds with the brilliant restricting move 22-26!
By occupying square 26, white establishes an unbreakable barrier. Black’s king cannot break through to the left, nor can it advance safely forward. White uses the two kings in tandem to shepherd black’s king away from the double corner. Once black’s king is dislodged, white marches directly toward the unpromoted man on square 3 or forces black into a terminal capture.
William Payne’s First Position proves that material equality or defensive positioning cannot rescue a player when the attacker commands both the opposition and the geometric diagonals.
The double corner haven versus the single corner trap
A fundamental law of draughts endgames is that not all corners of the board are created equal. The board contains two completely distinct types of corners: the double corner and the single corner.
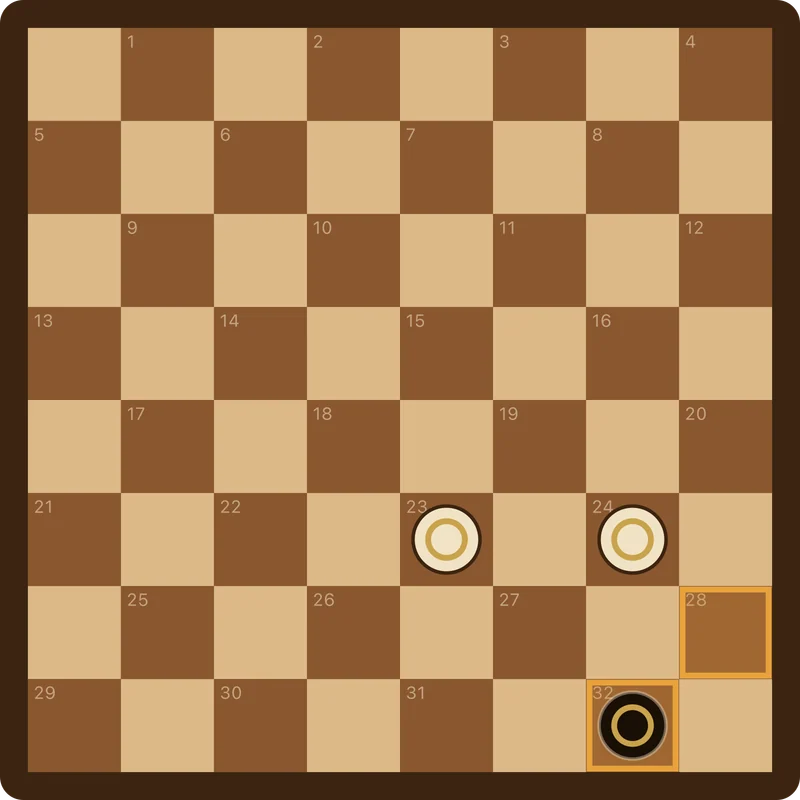
The double corner consists of two adjacent playable squares situated side by side along the edge: squares 1 and 5 in the upper left, and squares 28 and 32 in the lower right. The single corner consists of an isolated square at the sharp edge of the board: square 4 in the upper right, and square 29 in the lower left.
Understanding the profound difference between these two corners will save your endgames when defending and ensure clinical finishes when attacking.
Why the double corner is an impregnable fortress
One of the most surprising truths of checkers is that two kings cannot automatically defeat one lone defending king. If the defending king manages to reach the double corner, the game is a theoretical draw.
As William Payne analyzed in 1756 [3], a single king occupying squares 28 and 32 can shuttle endlessly back and forth between those two connected squares. Because the double corner contains two tandem squares, the defending king can step from 28 to 32, and then back from 32 to 28, without ever stepping into the open board.
If two opposing kings attempt to corner the defender, they discover a frustrating geometric dilemma. To attack square 32, an opposing king must occupy square 27 or square 28. But because capturing is compulsory under tournament rules [3], any clumsy attempt to crowd the defending king allows the defender to jump over the attacker or forces an immediate trade of pieces. If the attacker trades kings, the material reduces to one king against one king, which is a trivial draw.
In our overview of checkers rules that start arguments, we noted that many living-room players wrongly believe two kings always beat one. In reality, an experienced defender who senses defeat in the late game will immediately run their surviving king straight toward squares 28 and 32 to secure the double-corner draw.
The single corner death trap
While the double corner is a sanctuary, the single corner is a graveyard.
An isolated piece caught on square 4 or square 29 has no sister square to shuttle between. As William Payne documented in 1756 [3], a single king caught on square 29 can be completely paralyzed and captured by just one opposing king.
If black’s king sits on square 29, white simply needs to position a king to seal the diagonal exit. The moment black steps out of square 29, white immediately jumps and captures the piece, or leaves black with zero legal moves to force an instant loss by blockade. Never allow your king to be driven toward the single corner when playing defensively.
How to win with three kings against two kings
While two kings cannot break a lone king holding the double corner, three kings can systematically dismantle two defending kings.
In 1800, Joshua Sturges published his classic Guide to the Game of Draughts [4], categorizing the canonical endgame positions that build upon Payne’s foundations. Sturges demonstrated that three kings attacking two defending kings can always force a win, regardless of whether the defenders attempt to hold the double corner or roam the open board.
The strategy for converting three kings against two kings rests on three sequential phases:
- Severing communication: The attacker uses two kings to cut the board in half along the double diagonal, separating the two defending kings so they cannot support one another.
- Confining one defender: The attacker corners one of the defending kings into a restricted zone, leaving the second defending king powerless to intervene.
- Forcing a trade: Once the defensive coordination is broken, the attacker offers a clean one-for-one piece sacrifice.
This brings us to the fundamental mathematical rule of piece simplification formulated by Arthur Reisman in 1952 [5]. When you hold an advantage of three kings against two kings, your material advantage is exactly 50 percent (a ratio of 3 to 2). If you force an even trade of one king for one king, the board reduces to two kings against one king. Your material lead instantly doubles to 100 percent (a ratio of 2 to 1).
By simplifying the board, the attacker eliminates all defensive complications. The surviving lone defending king cannot hold the double corner against two coordinated kings if the attacker controls the entry files before the defender establishes the shuttle.
When you practice endgames on play checkers online, remember Reisman’s mathematical principle: every time you hold an extra piece, trading an equal pair of pieces amplifies your winning margin.
Tactical weapons in the endgame: the breeches and the blockade
Even in the sparsest endgames, tactical strikes remain lethal. Two specific weapons appear regularly in master-level play: the breeches and the blockade.
The breeches (the fork)
In draughts terminology, the tactic known as “the breeches” is the equivalent of a chess fork. As James Lees illustrated in 1892 [2], the breeches occurs when a king steps boldly into an open square directly between two opposing pieces situated on parallel diagonal lines.
Imagine two black checkers resting on squares 10 and 12. If a white king steps into square 15, the king wedges itself directly between the two black pieces. White threatens square 10 to the left and square 12 to the right. Because black can only move one piece per turn, black must move one checker to safety, leaving the second checker to be snapped up on white’s subsequent move. Executing the breeches is the fastest way to turn an equal endgame into an immediate piece advantage.
The blockade
In chess, depriving an opponent of all legal moves results in a draw by stalemate. In checkers, depriving an opponent of all legal moves is a glorious victory. Under standard draughts rules, a player who has no legal moves remaining on their turn immediately loses the match.
Endgame blockades frequently occur along the edges of the board. An ordinary checker trapped on the edge files possesses only a single forward step. A single opposing king can easily pin that piece against the wooden border, freezing it in place while hunting down the remaining enemy pieces across the board.
Flying kings and wider boards: how international variants change the endgame
So far, we have focused primarily on the classical 8x8 board of English draughts (American checkers), where kings move and jump only one diagonal square at a time. But millions of players worldwide compete under different regional rules, and those rule differences completely transform endgame dynamics.
In International draughts, played on a 10x10 board with twenty checkers per side, kings are flying pieces [2]. A crowned king (called a dame) can slide across any number of unoccupied diagonal squares in a single stride, jumping over enemy pieces from across the board. The same flying-king rule governs Russian shashki and Brazilian checkers on an 8x8 board.
Flying kings alter the nature of endgame cornering:
- The Petroff Triangle in Russian shashki: Because flying kings control entire diagonal highways, trapping a lone defending king requires constructing a geometric formation known as the Petroff Triangle. Three attacking kings must occupy the three vital controlling diagonals to box the lone king into an inescapable perimeter.
- The Long Diagonal in 10x10 draughts: A single flying king commanding the central main diagonal can easily paralyze multiple opposing pieces, making baseline control even more critical than in English draughts.
- Turkish dama: In Turkish dama, pieces move orthogonally (forward and sideways) across an uncheckered 8x8 board. Kings can sweep across entire files and ranks like chess rooks, turning the endgame into an intense race to build cross-file walls that hem the enemy into the baseline.
To explore how these fascinating regional traditions evolved, visit our comprehensive guide to checkers variants.
Four daily habits to sharpen your checkers endgames
Transforming your endgame play does not require memorizing thousands of variations. It requires developing four consistent mental habits at the board:
- Count the opposition before you trade: Never make a piece exchange in the late midgame without first checking who receives the move. Use Lees’ four-column rule to ensure that the simplified position leaves the opposition firmly in your hands.
- Head for the double corner when defending: If you find yourself down a piece in the endgame, abandon the center and steer your surviving king straight toward squares 28 and 32 (or squares 1 and 5). Shuttling between tandem squares is your only hope of securing a theoretical draw.
- Avoid the single-corner perimeter: When advancing your kings, never step blindly onto square 4 or square 29 unless you have calculated an immediate escape route. Getting trapped in the single corner is the hallmark of careless play.
- Simplify relentlessly when ahead: When you hold three kings against two, do not play cat-and-mouse. Use your superior force to corner one enemy piece and offer an equal trade. Reducing the board from 3-against-2 to 2-against-1 doubles your mathematical advantage and guarantees the win.
Endgames in checkers are where board mastery reveals itself. By combining the geometric insight of William Payne with the relentless logic of the opposition, you can sit down at the board with the quiet confidence that once you gain an advantage, victory is only a matter of mathematics.
Questions people ask
How many kings do you need to beat one king in checkers?
In standard English draughts, two kings cannot force a win against a single king that has reached the double corner (squares 1/5 or 28/32). To guarantee a win against any defending king on the board, you need at least two kings if the defender is in the open board, or three kings if the defender manages to reach the double corner.
What is William Payne’s First Position in draughts?
Published in 1756 by William Payne, First Position is the foundational endgame study of checkers. It demonstrates how two white kings on squares 19 and 23 systematically break down a black king on square 28 and a black man on square 3, proving how opposition and corner confinement force a decisive win.
Can you win checkers by blocking the opponent from moving?
Yes. Unlike chess, where a player with no legal moves achieves a stalemate draw, checkers rules dictate that a player who cannot make a legal move on their turn immediately loses the game. Blockades and pins are legitimate, decisive ways to win checkers endgames.
What happens if both players only have one king left?
When each player has only one king remaining and neither player can force an immediate capture, the game is declared an immediate theoretical draw. Both players can maneuver indefinitely without being forced into an error.
Sources
- Schaeffer, J., Burch, N., Björnsson, Y., Kishimoto, A., Müller, M., Lake, R., Lu, P., & Sutphen, S. (2007). Checkers Is Solved. Science, 317(5844), 1518–1522.
- Lees, J. (1892). Lees’ Guide to the Game of Draughts. E. Marlborough & Co., London.
- Payne, W. (1756). An Introduction to the Game of Draughts. London.
- Sturges, J. (1800). Guide to the Game of Draughts. London.
- Reisman, A. (1952). Championship Checkers: The Simplified Guide to Winning Checkers. David McKay Company.
- Boardgammon. “Checkers Crown: Play Online Checkers and Regional Draughts Variants.”
- Boardgammon. “Checkers Rules: How to Play, Movement, and Captures.”
- Boardgammon. “Play Checkers Online: Free Browser and Mobile Draughts.”
- Boardgammon. “Checkers Variants: The Kinds of Draughts Played Around the World.”
Found a mistake or an odd phrase? Tell us